

Know your machine
Before you build your printer on Day 2, it helps to know what each part does. An FDM printer is really five systems working together: structure, motion, extrusion, heating and cooling, and electronics. Learn these and assembly will feel like connecting parts you already understand.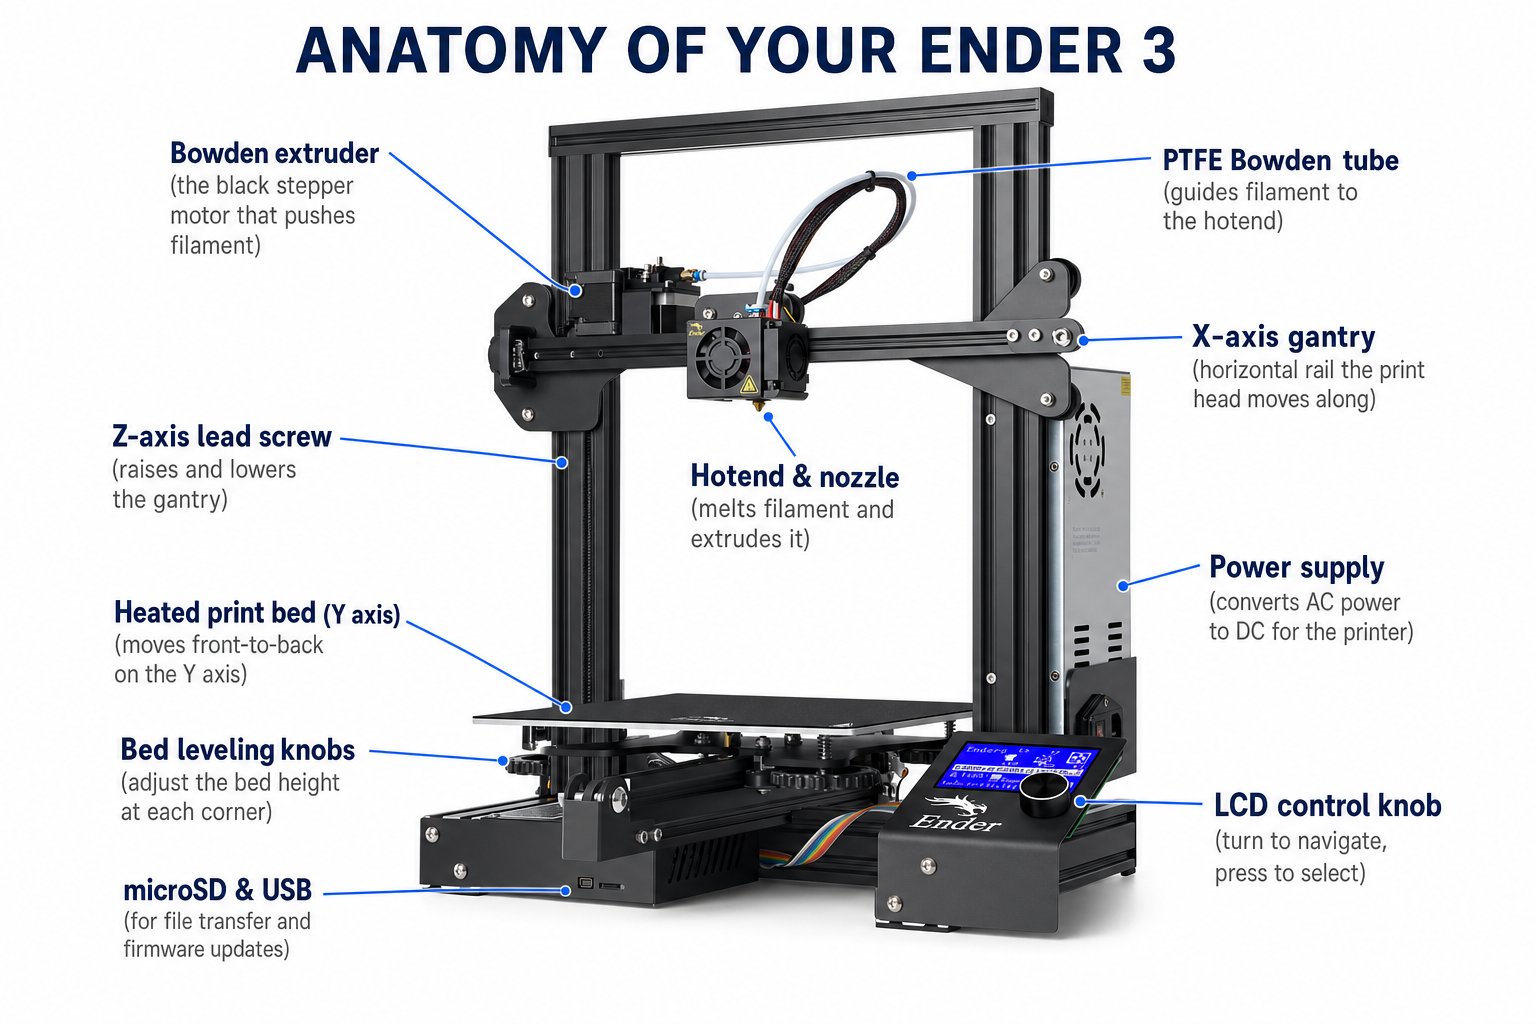
The major components of your Ender 3
Component categories at a glance
Structure and motion
The frame holds everything rigid while motors move the print head and bed with sub-millimeter precision. The Ender 3 is a “bed-slinger” - the bed moves forward and back while the gantry moves up and the print head moves side to side.Frame and base
Frame and base
The Ender 3 is built from aluminum extrusion - the silver bars with slots down the sides. The base holds the bed and electronics; two upright rails and a top crossbar form the gantry.
Build plate / print bed
Build plate / print bed
The heated surface where your print is created. It slides forward and back on the Y axis and can be leveled with four knobs underneath.
Rollers and V-slot rails
Rollers and V-slot rails
Instead of metal rods, the Ender 3 uses rollers that ride inside the V-shaped slots of the aluminum rails. This is what makes motion smooth on each axis.
Lead screw (Z axis)
Lead screw (Z axis)
A long threaded rod on the left drives the gantry up and down. Turning slowly and precisely, it sets the height of each new layer.
Belts (X and Y axes)
Belts (X and Y axes)
Rubber timing belts move the print head left/right (X) and the bed forward/back (Y). Belt tension matters - too loose and prints shift or ghost.
Limit switches / endstops
Limit switches / endstops
Small switches detect the home position of each axis so the printer knows exactly where “zero” is before a print.
Stepper motors
Stepper motors
Drive the axes and the extruder in precise steps. The Ender 3 uses NEMA 17 stepper motors.
Extrusion system
This is the heart of the printer - the parts that melt filament and deposit it exactly where the G-code says. The Ender 3 uses a Bowden setup: the extruder motor is mounted on the frame and pushes filament through a tube to the hotend.Extruder
Extruder
A geared motor assembly that grabs the filament and pushes it into the PTFE tube. On a Bowden printer, it sits on the frame rather than on the print head.
PTFE (Bowden) tube
PTFE (Bowden) tube
A low-friction white tube that guides the filament from the extruder to the hotend.
Hotend
Hotend
Heats and melts the filament so it can flow. For PLA it runs around 200 C.
Nozzle
Nozzle
The precision tip that deposits melted plastic. Your kit uses a standard 0.4 mm brass nozzle.
Thermistor
Thermistor
Measures the hotend temperature and reports it to the mainboard so heating stays precise and safe.
Heating and cooling
Temperature control happens in two places - the bed and the print itself - and both matter for quality.Heated bed
Warms the print surface for better first-layer adhesion and less warping.
Part cooling fan
Blows air on freshly extruded plastic to solidify it quickly. Critical for clean overhangs and fine detail.
Hotend fan
Cools the upper part of the hotend so heat does not creep up and soften filament too early (which causes clogs).
Power supply fan
Keeps the power supply cool during long prints.
Electronics
The electronics are the brain and nervous system of the machine.Mainboard
Mainboard
The brain of the printer. It reads G-code from the microSD card and controls the motors, heaters, and fans in perfect sync.
Power supply unit (PSU)
Power supply unit (PSU)
Converts wall AC power into the 24 V DC the printer needs. It has a voltage selector switch you must set to match your region (115 V or 230 V).
LCD control box
LCD control box
Your control panel - a screen and a click-wheel knob for moving the printer, leveling, and starting prints.
microSD card slot
microSD card slot
Loads your sliced G-code files. You copy files onto the card, then insert it into the printer.
How it all connects
Here is the full chain of events when you print:- The mainboard reads the G-code file from the microSD card.
- It tells the stepper motors to move the head and bed along X, Y, and Z, using limit switches to find home.
- The heater warms the hotend and the heated bed, watched by thermistors.
- The extruder pushes filament through the PTFE tube into the hotend, where it melts and flows out the nozzle.
- The part cooling fan solidifies each layer while the gantry steps up the Z axis for the next one.