

Bringing your printer to life
Everything is assembled and filament is loaded. Now we power on the Adventurer 5M, walk through the on-screen setup, connect it to Wi-Fi, bind it to the Flash Maker app on your phone, and run automatic calibration. By the end you will be ready to print.For this step you will need your home Wi-Fi name and password and a smartphone to install the Flash Maker app. If you do not know your Wi-Fi details, ask a parent or guardian.
Power on
1
Plug into the wall
Connect the power cable to a wall outlet with the printer switch still off.
2
Flip the power switch on
Turn the switch to the on (I) position. The FlashForge logo appears, then the printer plays a short jingle and shows “initialization” while it boots. Give it a minute.
3
Select your language
When the boot completes, choose your language (English is the default) and tap the blue Next button at the bottom right.
On-screen setup checklist
The printer confirms a few things before it calibrates:1. Confirm packing materials are removed
1. Confirm packing materials are removed
Verify there is no foam, no stickers, and the four bed screws are removed - which you did during assembly. Everything should be clear.
2. Confirm the heated bed is unlocked
2. Confirm the heated bed is unlocked
The printer needs the bed free to calibrate. You unlocked it when you removed the four silver screws on the base plate.
3. Continue to network setup
3. Continue to network setup
Tap Next to move to the Wi-Fi settings page.
Connect to Wi-Fi
1
Turn on Wi-Fi
On the network settings page, toggle the Wi-Fi icon to on. A “please wait” message appears while the printer scans for networks.
2
Select your home network
Choose your network from the list by its name (SSID). You must know your home network name - this is the network your printer will use to receive print jobs.
3
Enter your password
Type your Wi-Fi password and wait for the printer to connect.
4
Confirm connection
A green checkmark confirms the SSID connected and an IP address was assigned. Tap OK.
Bind the Flash Maker app
The printer displays a QR code to link it to a Flash Maker account.1
Install Flash Maker
On your phone, open the app store and search Flash Maker (look for the black and white logo). Install and open it.
2
Accept the agreement
Read the user agreement and privacy policy, then tap I agree.
3
Register an account
Tap Register account. Enter your email, create a password, and request a verification code. Check your email for a message from FlashForge and enter the one-time code.
4
Add the printer
In the app, tap the plus (+) icon to add a printer, allow camera access, and scan the QR code on the printer screen.
5
Confirm binding
The app asks to confirm binding the Adventurer 5M to your account. Tap Confirm binding. Your printer appears in the app with its serial number, and the status updates to idle.
Binding links your specific printer to your Flash Maker account so you can monitor and control it remotely - even from outside your home if you add the optional camera.
Run automatic calibration
The Adventurer 5M probes the bed at many points and automatically compensates for any unevenness, so your first layer comes out flat and even without manual knob-twisting.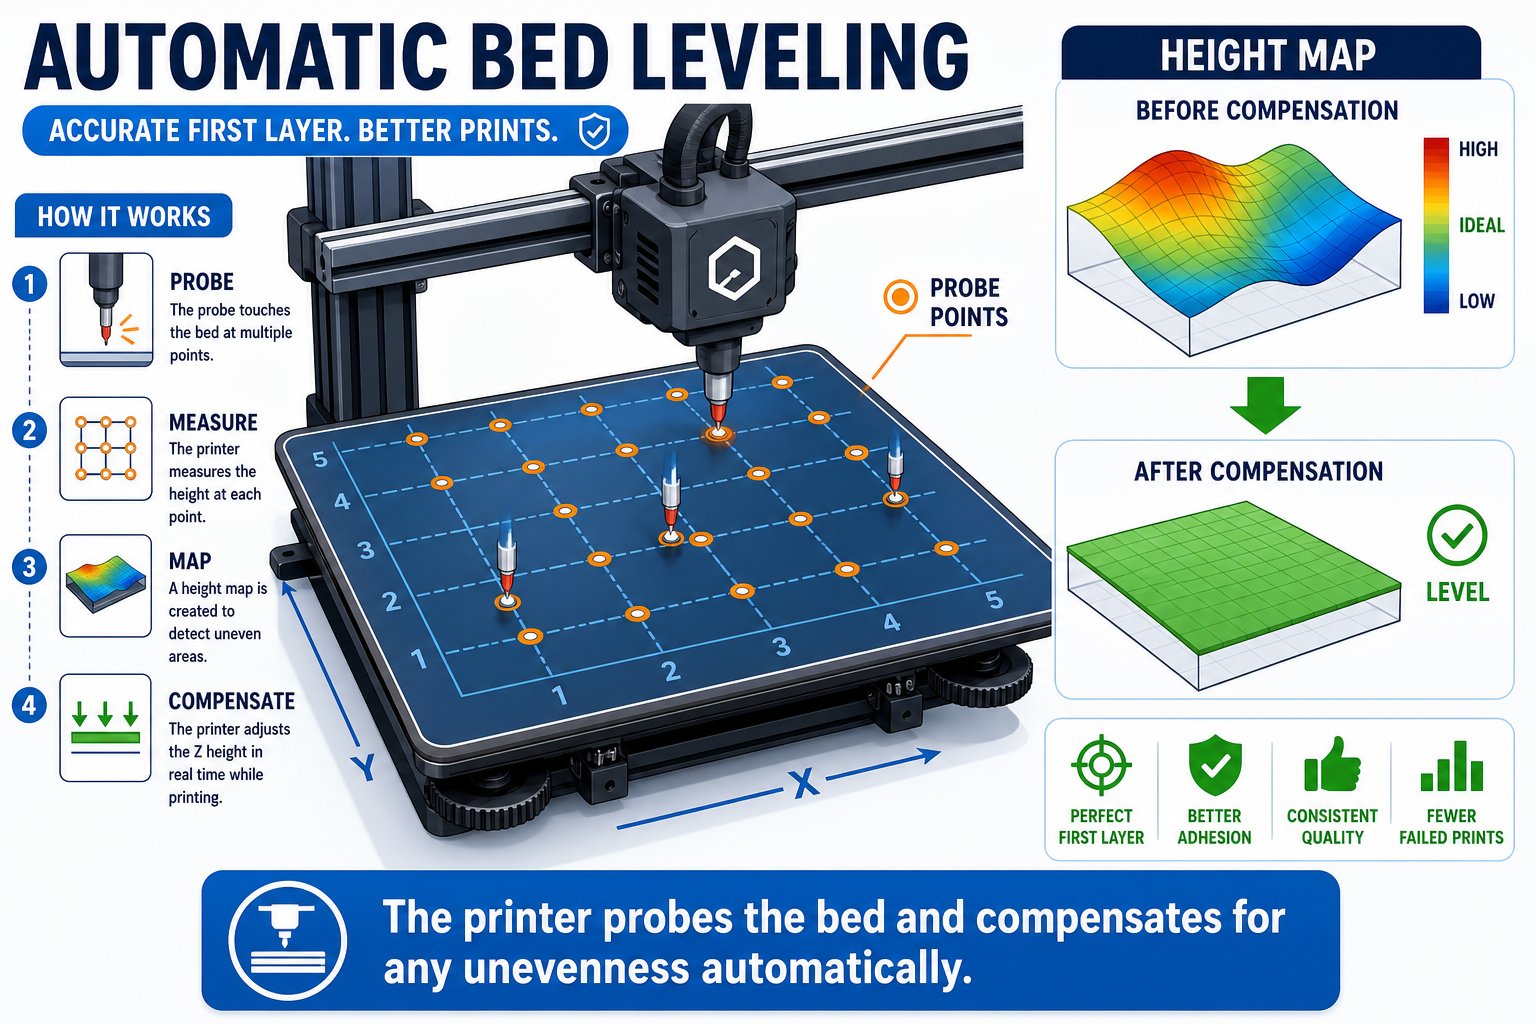
How automatic bed leveling works
1
Start calibration
Back on the printer, tap Next. The printer begins automatic calibration.
2
Do not touch the printer
Calibration runs through four cycles and takes a few minutes. Do not touch the printer while it works - just let it finish. The app will show the printer as “busy.”
3
Wait for the countdown to finish
When the on-screen timer counts down to zero and all four cycles complete, calibration is done.
4
Skip or run filament loading
The printer offers to walk you through loading filament. Since you already loaded it, you can tap Skip. Your printer is now ready to print.
You are ready to print
Once calibration finishes and filament is loaded, you can start printing:- Design a model on your computer, or download a G-code or model file from a free 3D model site.
- Upload it to your Flash Maker account. It syncs to the app on your phone.
- Open the print in the app and send it straight to your printer. It even shows an estimated print time.
Print from your phone
Send jobs to the printer from the Flash Maker app anywhere on your network.
Optional camera
Add a camera to watch your prints live from anywhere with an internet connection.
Remote stop
Spot a problem? Stop the print from your phone, even after it finishes.
Your printer is powered on, connected to Wi-Fi, bound to Flash Maker, and calibrated. Filament is loaded and you are ready to send your first print.