> ## Documentation Index
> Fetch the complete documentation index at: https://stem-docs.intellectualpoint.com/llms.txt
> Use this file to discover all available pages before exploring further.
# Flash the SD card
> Download the Raspberry Pi Imager, write the OS to your SD card, and configure WiFi, SSH, and Raspberry Pi Connect.
## Flash the SD card
**Time**: 9:45 AM to 10:30 AM
In this section you will write a complete operating system onto a microSD card so your robot can boot up, connect to WiFi, and be accessible from your laptop. Every click is documented below with a screenshot — follow each step exactly.
### What you need before starting
Make sure you have all three of these items from your kit:
* **MicroSD card** — a small card about the size of your thumbnail
* **SD card reader** — a USB adapter that the microSD card slides into
* **Your laptop** — with internet access to download the Raspberry Pi Imager
If anything is missing from your kit, let a facilitator or TA know before continuing.
### Remove the SD card from the robot
The Raspberry Pi sits below the Robot HAT board on the robot. The SD card slot is accessible from the **back of the robot** — you do not need to flip anything over.
To remove it:
1. Look at the back of the robot. You will see the edge of the Raspberry Pi board with a small silver card sticking out of the slot.
2. **Push the card gently inward** — you will feel a click — then release. The card springs out slightly so you can pull it free.
3. Set the card aside. You will insert it into your SD card reader in a moment.
Be gentle when handling the microSD card. Do not bend it or touch the gold contacts on the bottom.
### Download and install Raspberry Pi Imager
Go to [raspberrypi.com/software](https://www.raspberrypi.com/software/) in your browser and click the **Download for macOS** button (or the appropriate button for your operating system).
The download starts automatically. Wait for it to finish — the file is about 40 MB.
Open the downloaded `.dmg` file. A window appears showing the Raspberry Pi Imager icon and an Applications folder. **Drag the Imager icon into the Applications folder.**
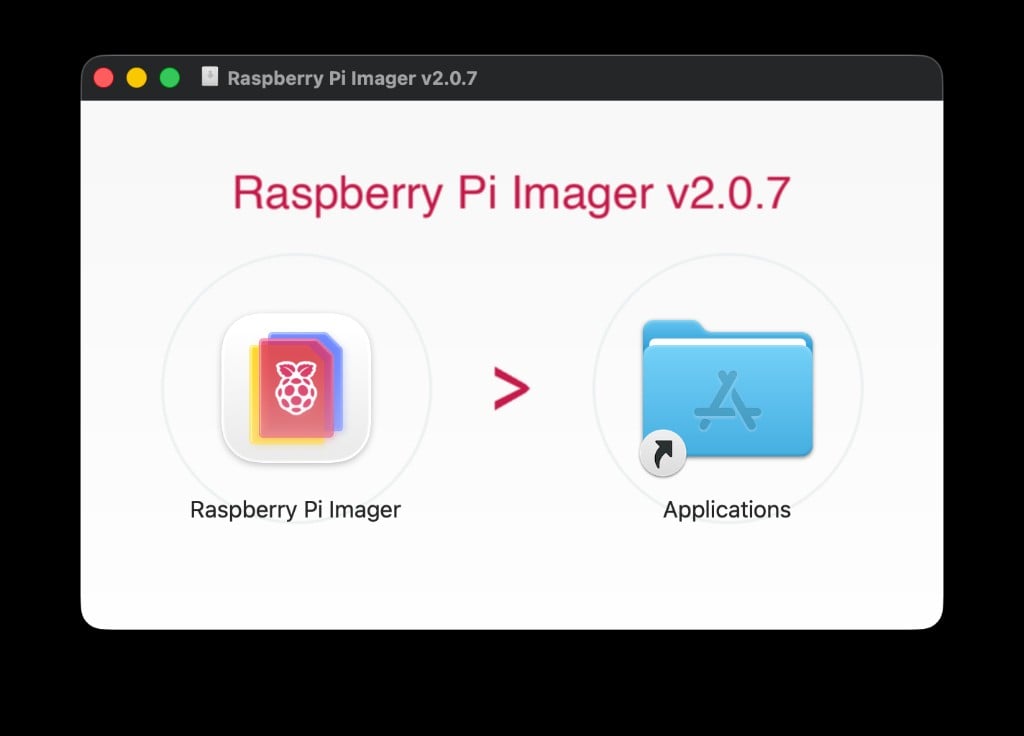 Open **Finder**, navigate to **Applications**, and double-click **Raspberry Pi Imager**.
You can also press `Cmd + Space` to open Spotlight, type **Raspberry Pi Imager**, and press Enter.
Since this app was downloaded from the internet, macOS may show a security warning asking if you want to open it. Click **Open** to continue.
If you do not see the warning, the Imager opens directly — that is fine too.
### Configure the Imager
Now you will tell the Imager exactly what device you have, what operating system to install, and where to write it. Follow each step and confirm your screen matches the screenshot before moving on.
In the Imager window, click the **Choose Device** button.
Open **Finder**, navigate to **Applications**, and double-click **Raspberry Pi Imager**.
You can also press `Cmd + Space` to open Spotlight, type **Raspberry Pi Imager**, and press Enter.
Since this app was downloaded from the internet, macOS may show a security warning asking if you want to open it. Click **Open** to continue.
If you do not see the warning, the Imager opens directly — that is fine too.
### Configure the Imager
Now you will tell the Imager exactly what device you have, what operating system to install, and where to write it. Follow each step and confirm your screen matches the screenshot before moving on.
In the Imager window, click the **Choose Device** button.
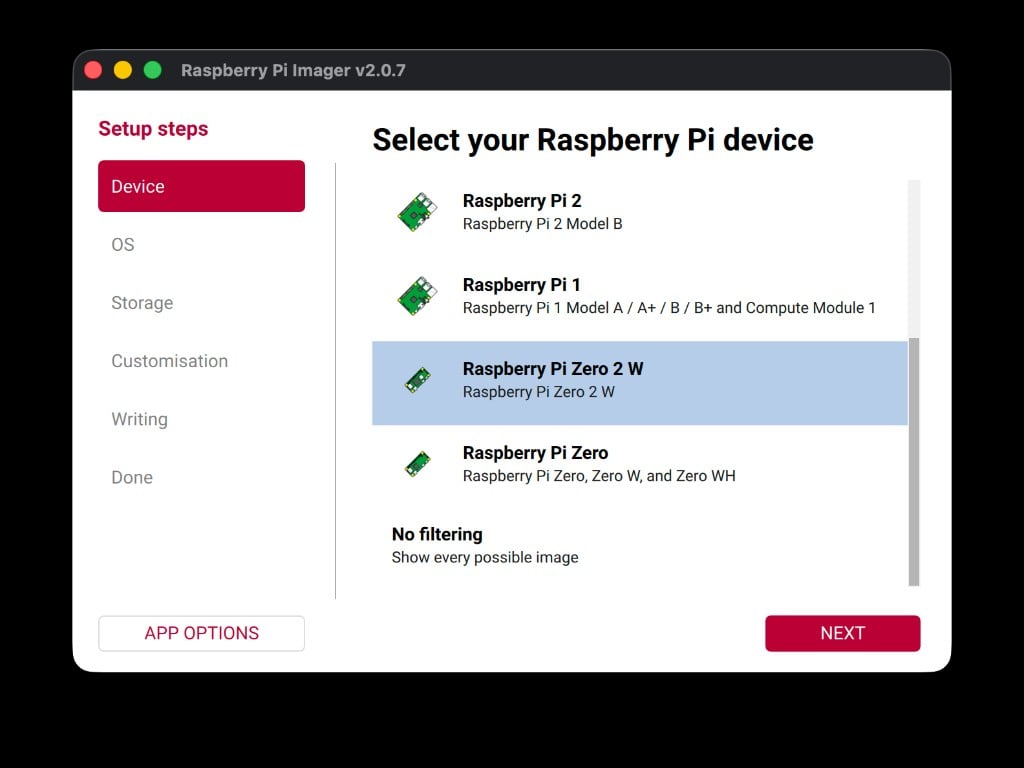
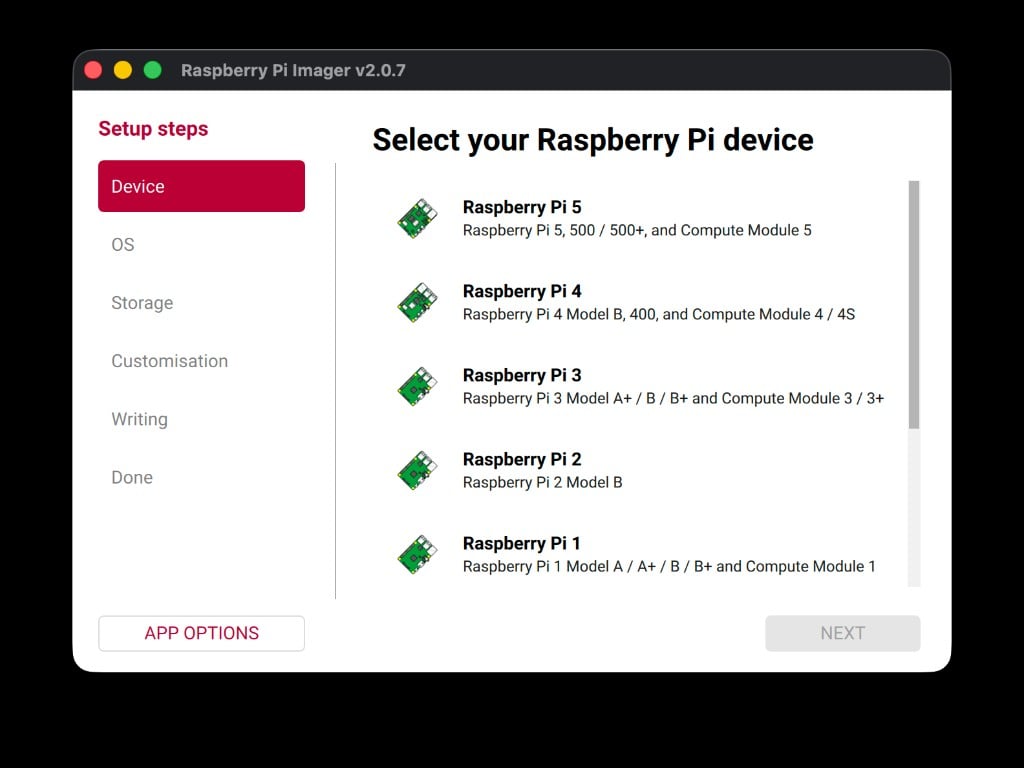 A list of Raspberry Pi models appears. Scroll down and select **Raspberry Pi Zero 2 W**.
 Click the **Choose OS** button. Select **Raspberry Pi OS (32-bit)** — this is the version based on Debian Trixie with Desktop. It should be the first recommended option in the list.
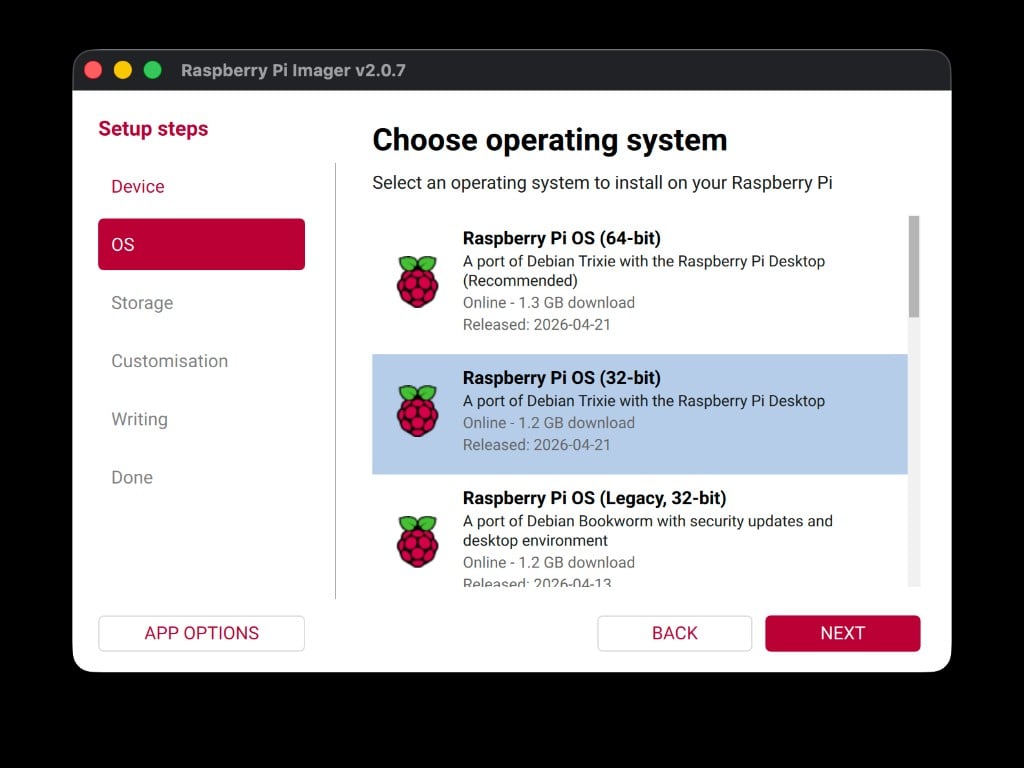 Do **not** select the 64-bit version or Raspberry Pi OS Lite. The PiCar-X requires the 32-bit Desktop version.
Insert your **microSD card** into the **SD card reader**, then plug the reader into a USB port on your laptop.
Back in the Imager, click **Choose Storage** and select the SD card that appears. It is usually labeled with its storage size (for example, "32 GB").
Do **not** select the 64-bit version or Raspberry Pi OS Lite. The PiCar-X requires the 32-bit Desktop version.
Insert your **microSD card** into the **SD card reader**, then plug the reader into a USB port on your laptop.
Back in the Imager, click **Choose Storage** and select the SD card that appears. It is usually labeled with its storage size (for example, "32 GB").
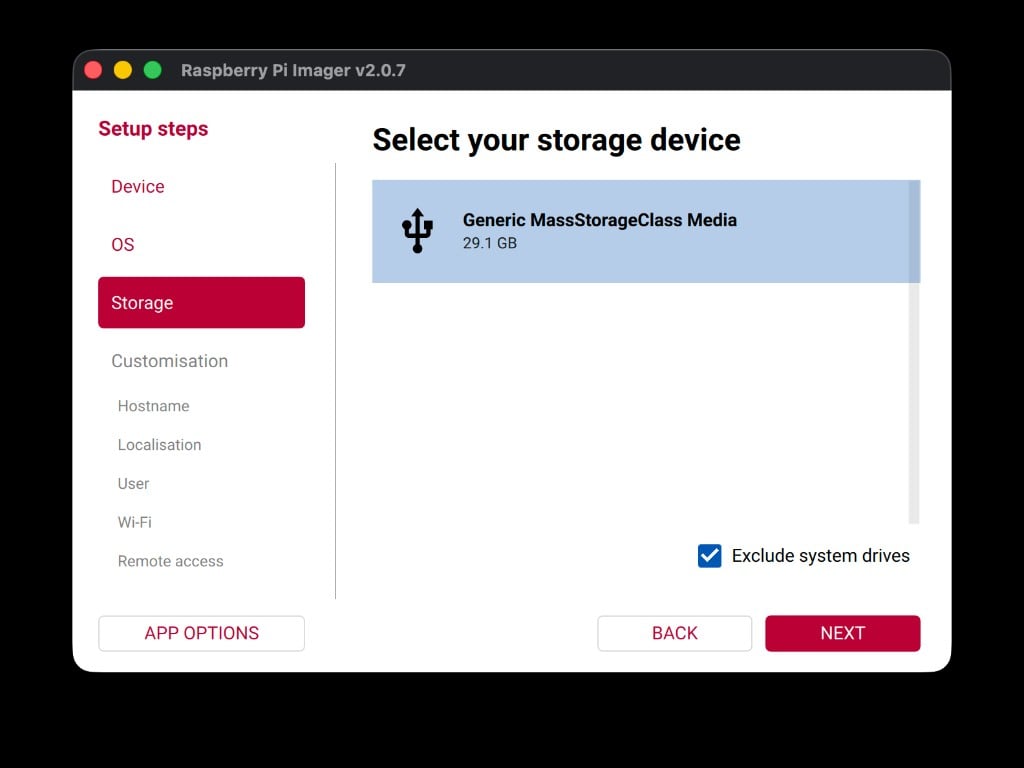 Make sure you select the SD card — not your laptop's hard drive. If you are unsure which device is the SD card, ask a TA before continuing.
Click **Next**. The Imager asks if you want to customize the OS settings. Click **Edit Settings** to open the customization panel.
This is where you configure your hostname, login credentials, WiFi, and more. The next several steps walk through each setting.
### General settings
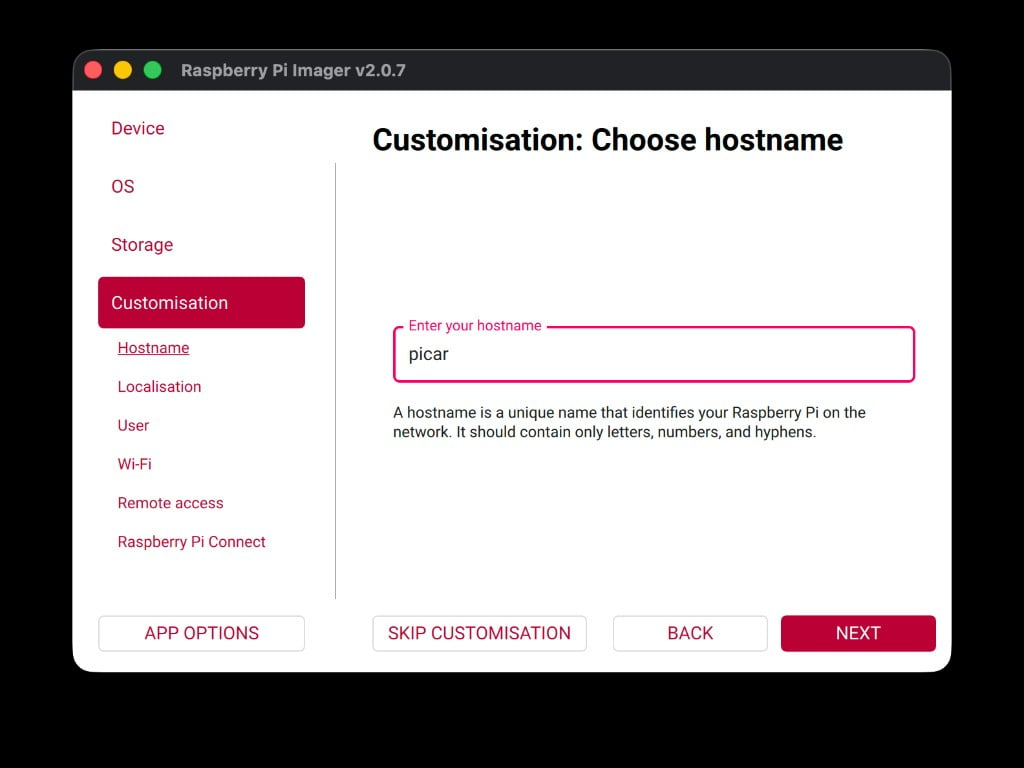
Check the **Set hostname** box and type:
```
picar
```
This is the name your robot will use on the network. You will use it later to connect via SSH.
Make sure you select the SD card — not your laptop's hard drive. If you are unsure which device is the SD card, ask a TA before continuing.
Click **Next**. The Imager asks if you want to customize the OS settings. Click **Edit Settings** to open the customization panel.
This is where you configure your hostname, login credentials, WiFi, and more. The next several steps walk through each setting.
### General settings
Check the **Set hostname** box and type:
```
picar
```
This is the name your robot will use on the network. You will use it later to connect via SSH.
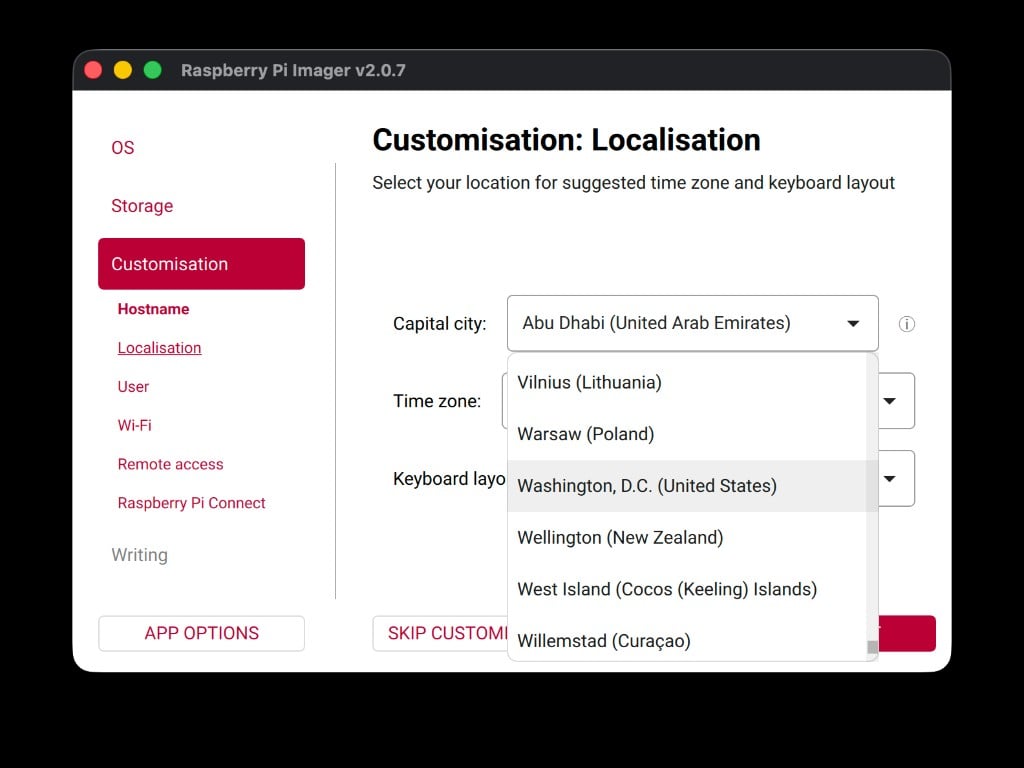
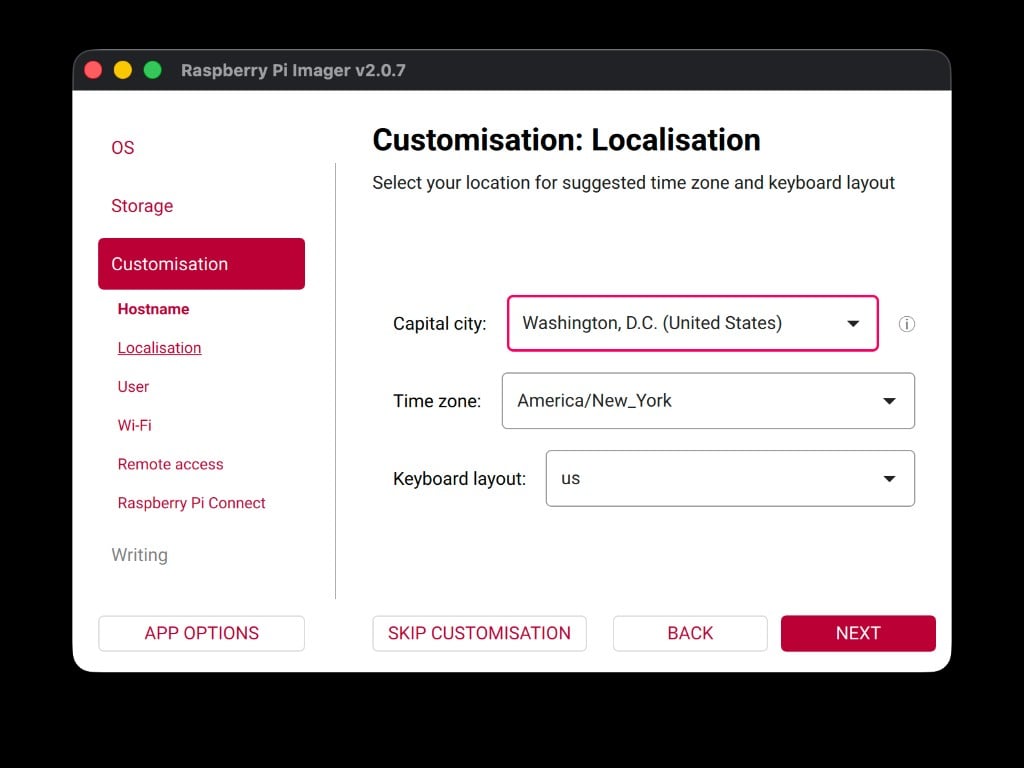
 Scroll down to the locale section. Set the **Time zone** to **America/New\_York** and the **Keyboard layout** to **us**.
To find the timezone, scroll down to **Washington, D.C.** or type it into the search field if one is available.
Scroll down to the locale section. Set the **Time zone** to **America/New\_York** and the **Keyboard layout** to **us**.
To find the timezone, scroll down to **Washington, D.C.** or type it into the search field if one is available.
 Check the **Set username and password** box. Enter the following:
| Field | Value |
| -------- | ----- |
| Username | `car` |
| Password | `car` |
Check the **Set username and password** box. Enter the following:
| Field | Value |
| -------- | ----- |
| Username | `car` |
| Password | `car` |
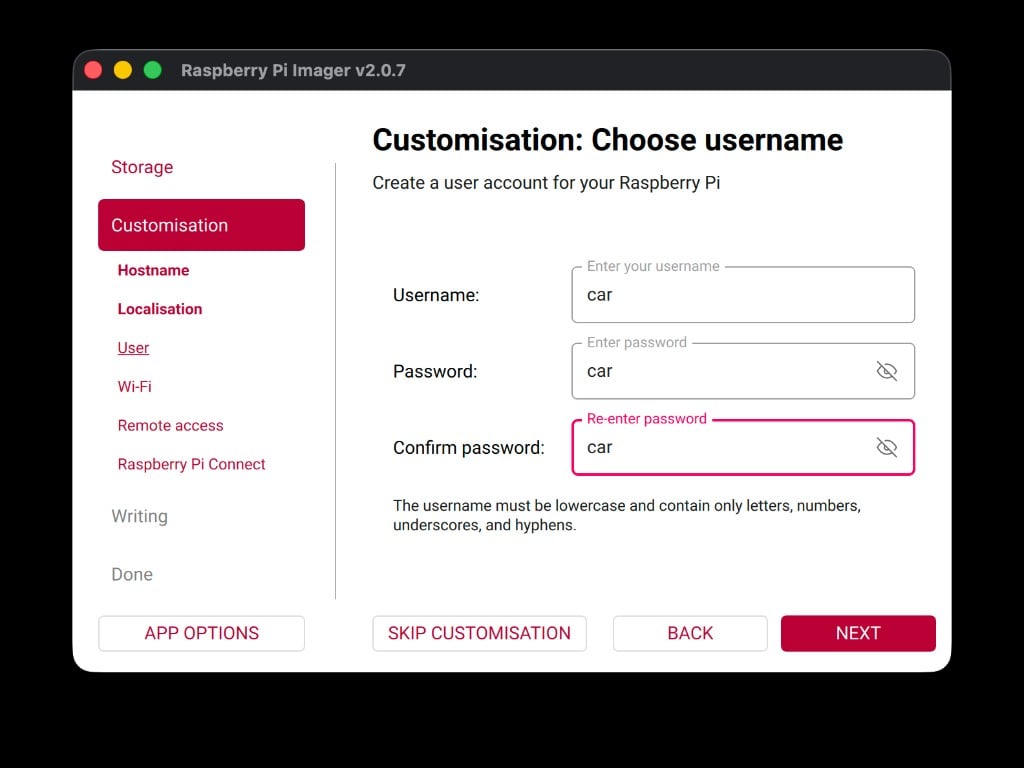 Everyone in the camp uses the same username and password so facilitators can help troubleshoot. This keeps things consistent across all robots.
Check the **Configure wireless LAN** box. Your facilitator will provide the WiFi network name and password. Enter them here:
| Field | Value |
| -------------------- | -------------------------------- |
| SSID | *(provided by your facilitator)* |
| Password | *(provided by your facilitator)* |
| Wireless LAN country | `US` |
Everyone in the camp uses the same username and password so facilitators can help troubleshoot. This keeps things consistent across all robots.
Check the **Configure wireless LAN** box. Your facilitator will provide the WiFi network name and password. Enter them here:
| Field | Value |
| -------------------- | -------------------------------- |
| SSID | *(provided by your facilitator)* |
| Password | *(provided by your facilitator)* |
| Wireless LAN country | `US` |
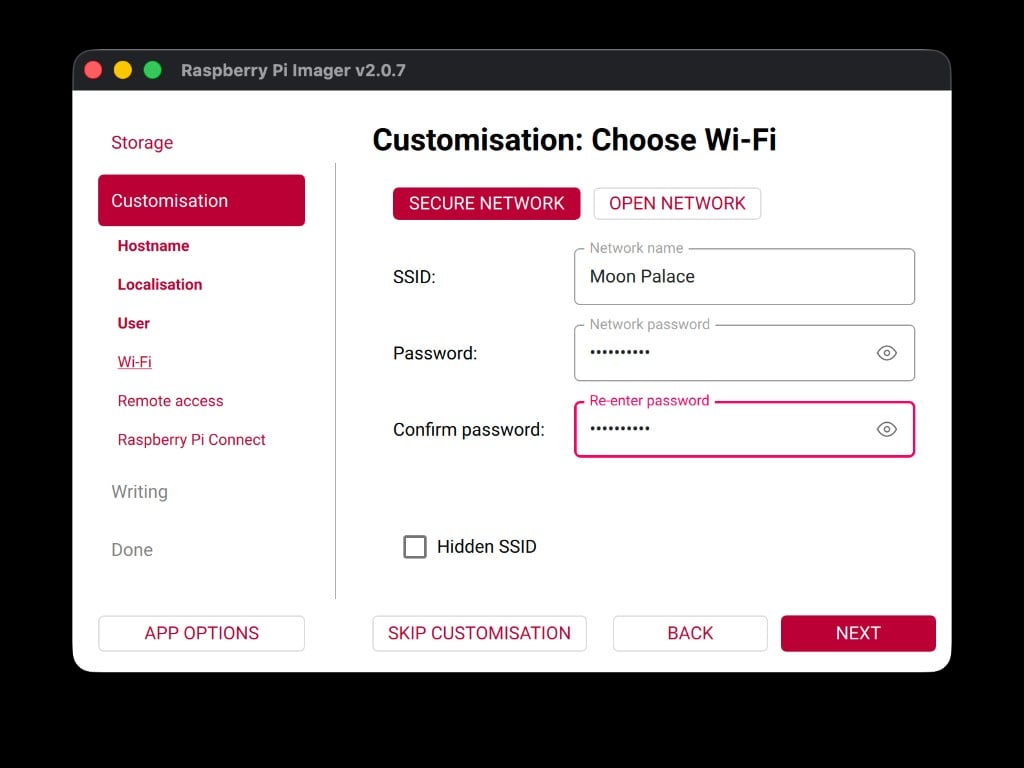 Double-check the WiFi name and password character by character. A single typo means the robot will not connect to the network, and you will need to re-flash the SD card.
### Services settings
Click the **Services** tab at the top of the customization panel.
Find the **Enable SSH** toggle. It starts in the off position.
Double-check the WiFi name and password character by character. A single typo means the robot will not connect to the network, and you will need to re-flash the SD card.
### Services settings
Click the **Services** tab at the top of the customization panel.
Find the **Enable SSH** toggle. It starts in the off position.
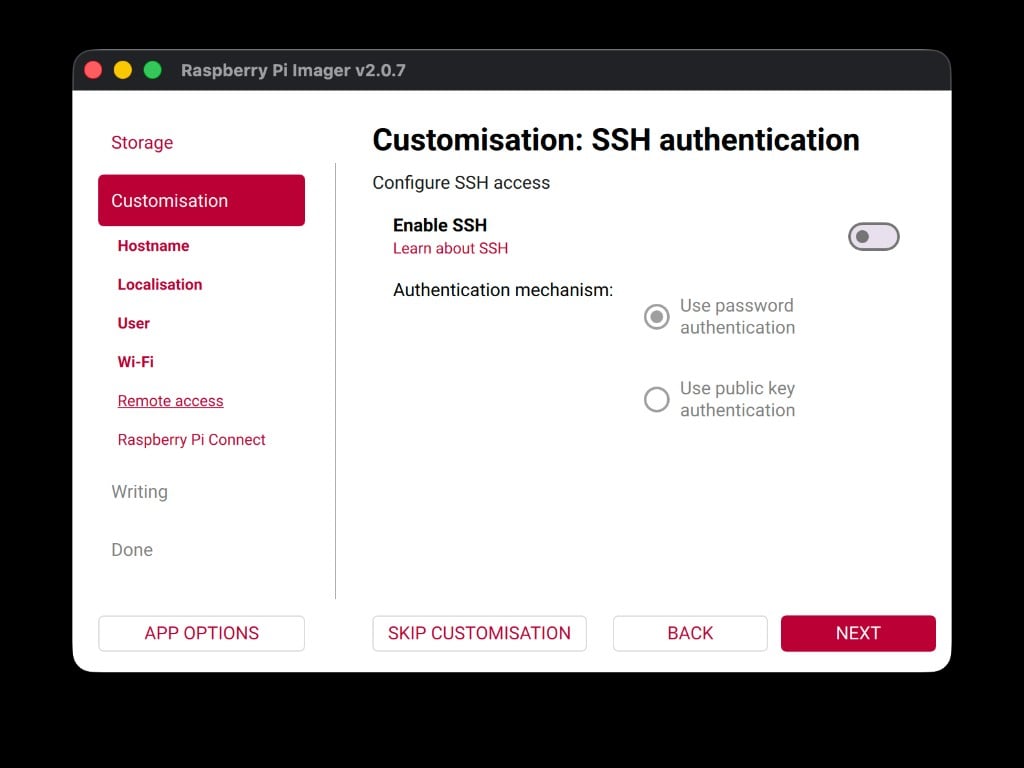 Click the toggle to turn it **on**, then select **Use password authentication**.
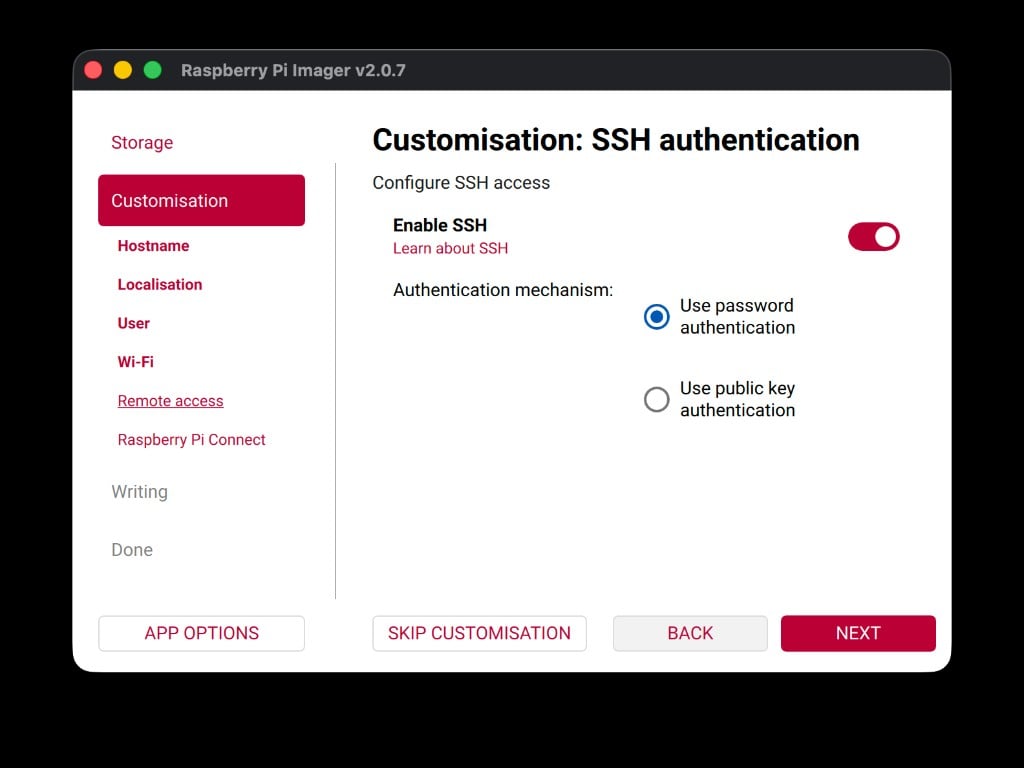 SSH (Secure Shell) lets you type commands on your robot from your laptop's terminal. Without it enabled, you would have no way to control the Pi remotely.
### Raspberry Pi Connect
Still on the Services tab, you will now enable Raspberry Pi Connect. This gives you a backup way to reach your robot through a web browser — even if SSH has issues.
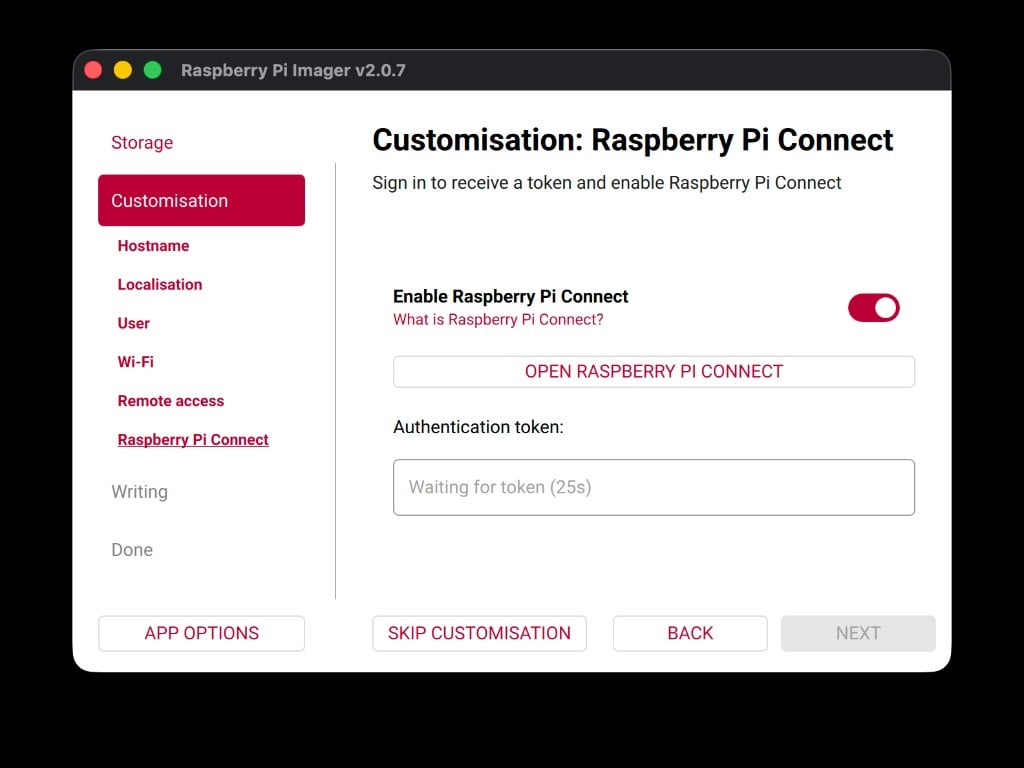
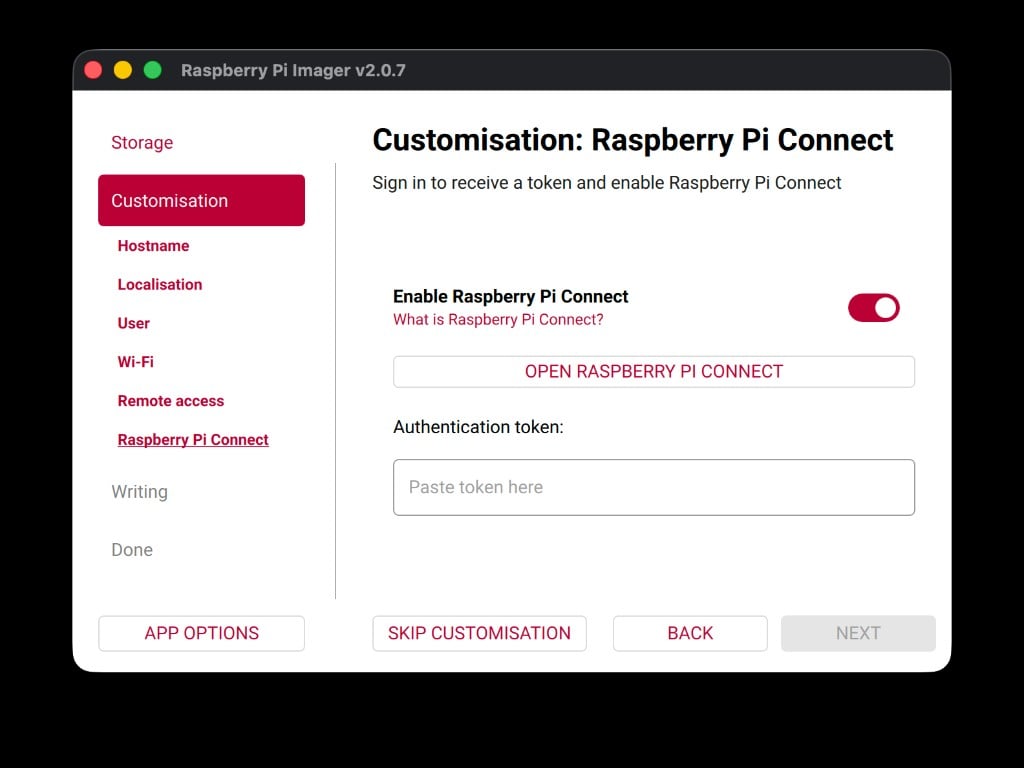
Find the **Raspberry Pi Connect** toggle and switch it on. The Imager opens a sign-in page in your browser.
SSH (Secure Shell) lets you type commands on your robot from your laptop's terminal. Without it enabled, you would have no way to control the Pi remotely.
### Raspberry Pi Connect
Still on the Services tab, you will now enable Raspberry Pi Connect. This gives you a backup way to reach your robot through a web browser — even if SSH has issues.
Find the **Raspberry Pi Connect** toggle and switch it on. The Imager opens a sign-in page in your browser.
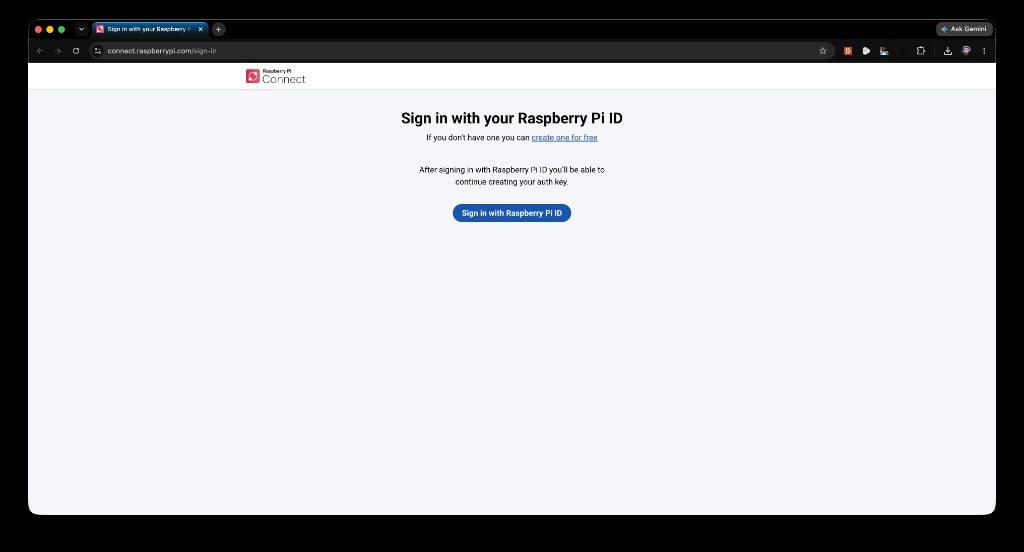
 On the sign-in page, click **create one for free** to make a new account.
 Fill in your email address, choose a password, and enter your name. Then click **Continue**.
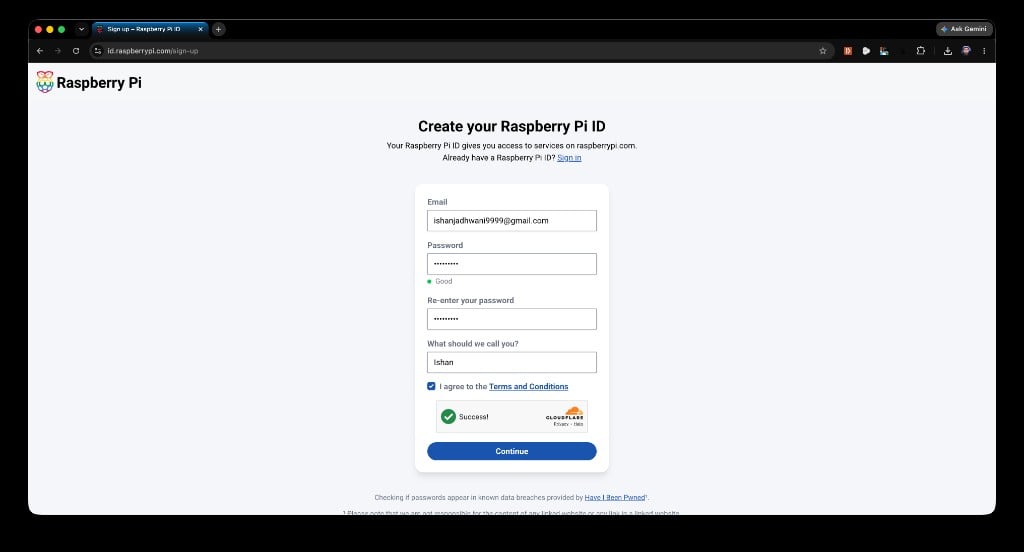 Use an email you can check right now — you need to verify it in the next step.
The Raspberry Pi website asks you to confirm your email address.
Use an email you can check right now — you need to verify it in the next step.
The Raspberry Pi website asks you to confirm your email address.
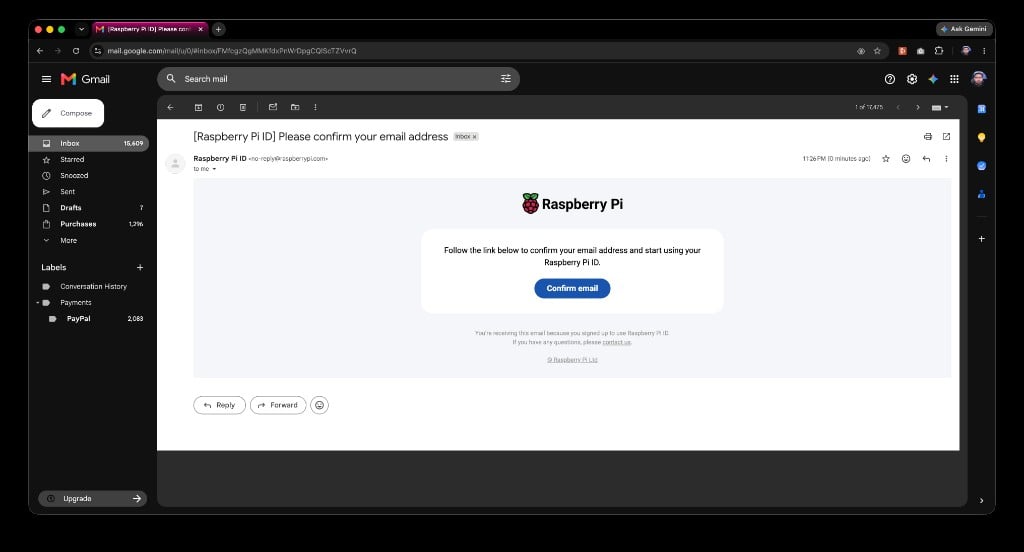
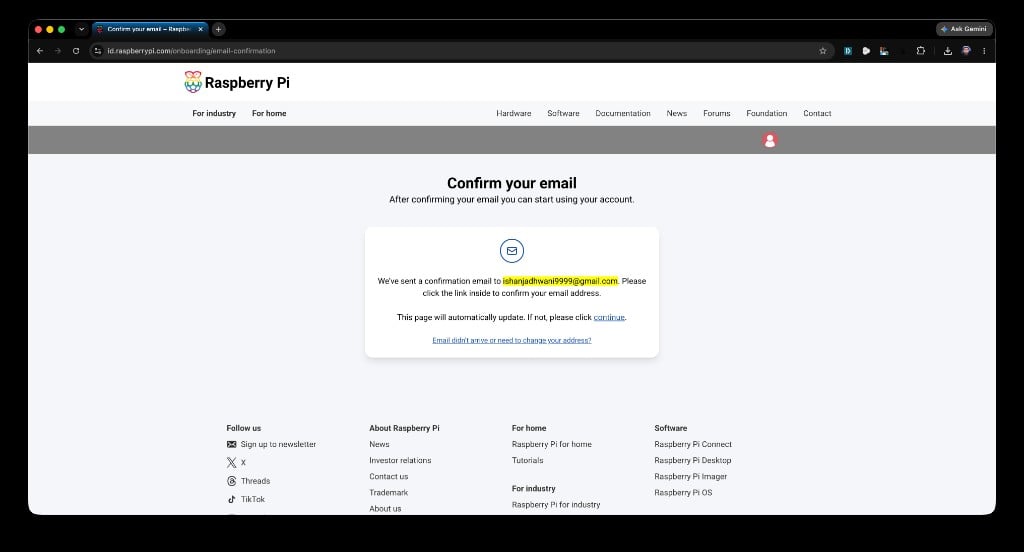 Open your email inbox (Gmail, Outlook, etc.), find the message from **Raspberry Pi ID**, and click the **Confirm email** button inside it.
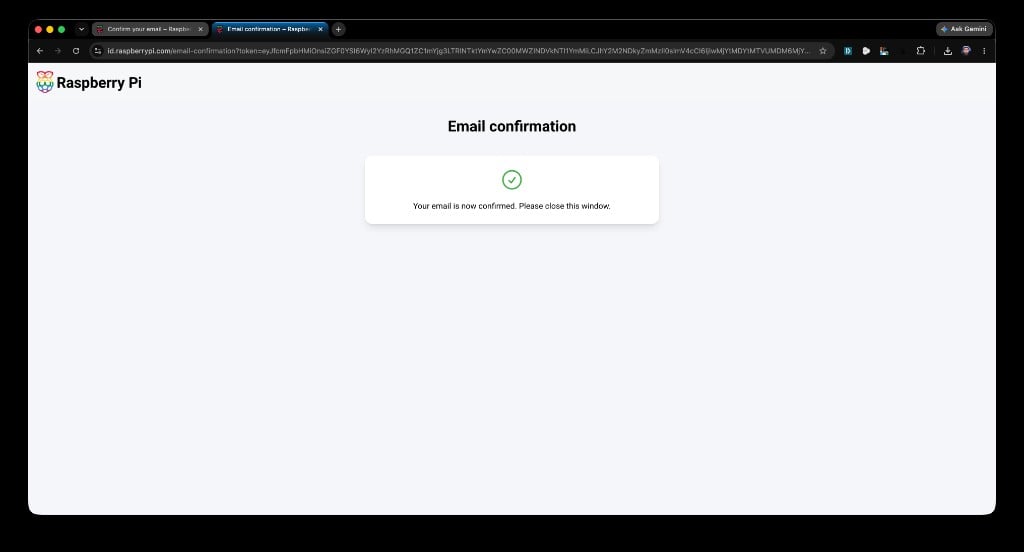
 After clicking the link, you see a confirmation page that says **"Your email is now confirmed."** You can close this tab.
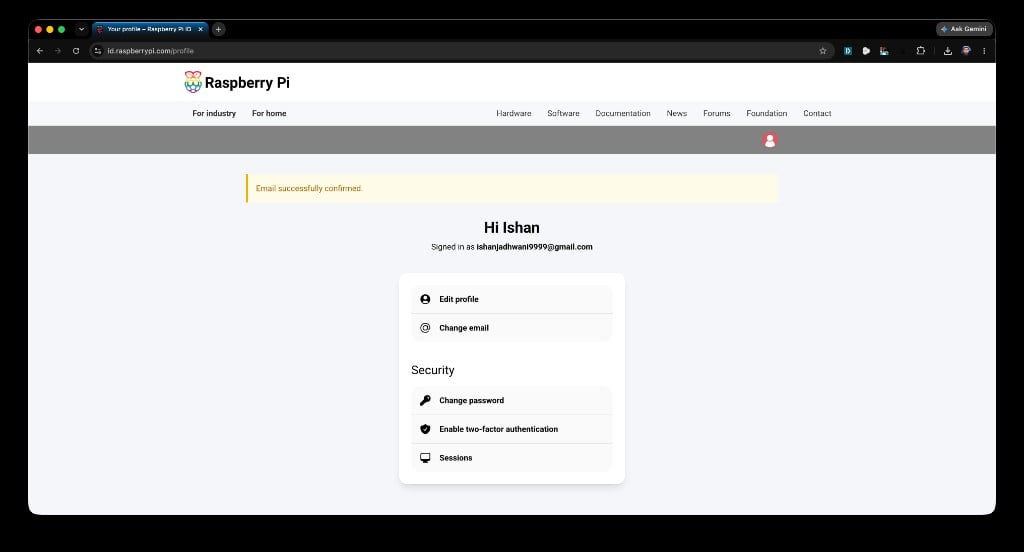
 You are now signed in to your Raspberry Pi account. You should see your profile page with a green **"Email successfully confirmed"** banner.
 Go back to the Raspberry Pi Imager and click the **Open Raspberry Pi Connect** button again. This opens a new browser tab showing the sign-in page. Since you just created your account, it now shows a blue **Sign in as \[your name]** pill. Click it to sign in.
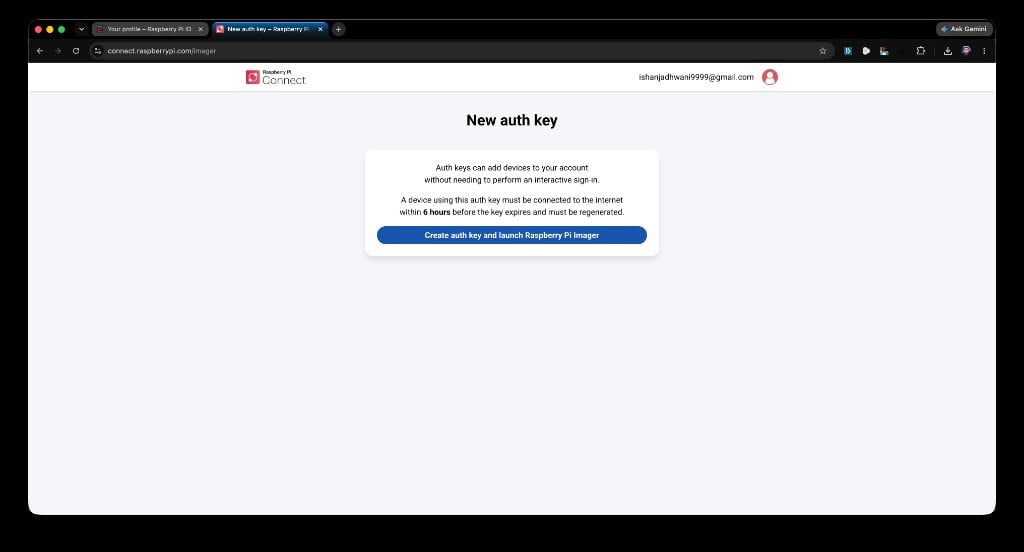
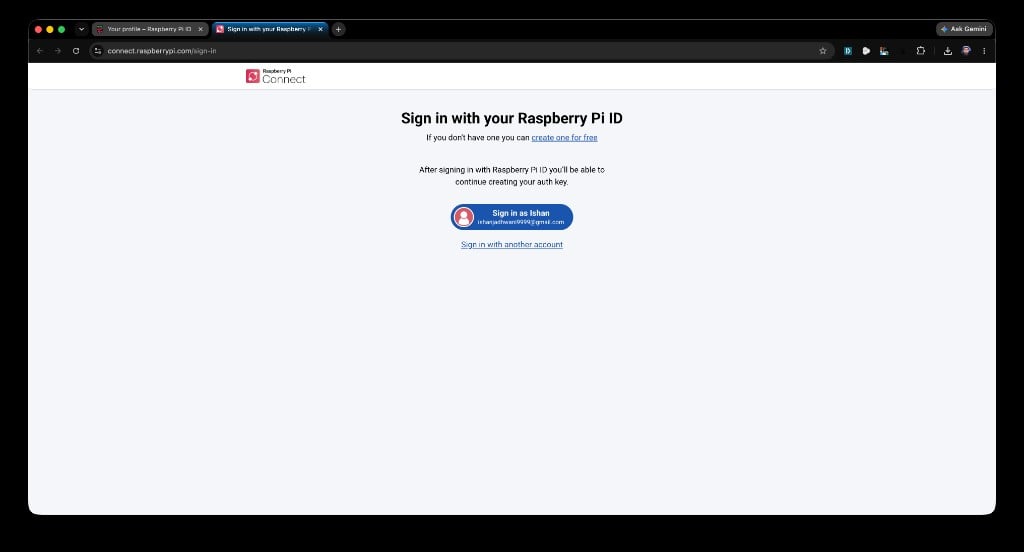 After signing in, the page shows **"New auth key"**. Click the **Create auth key and launch Raspberry Pi Imager** button.
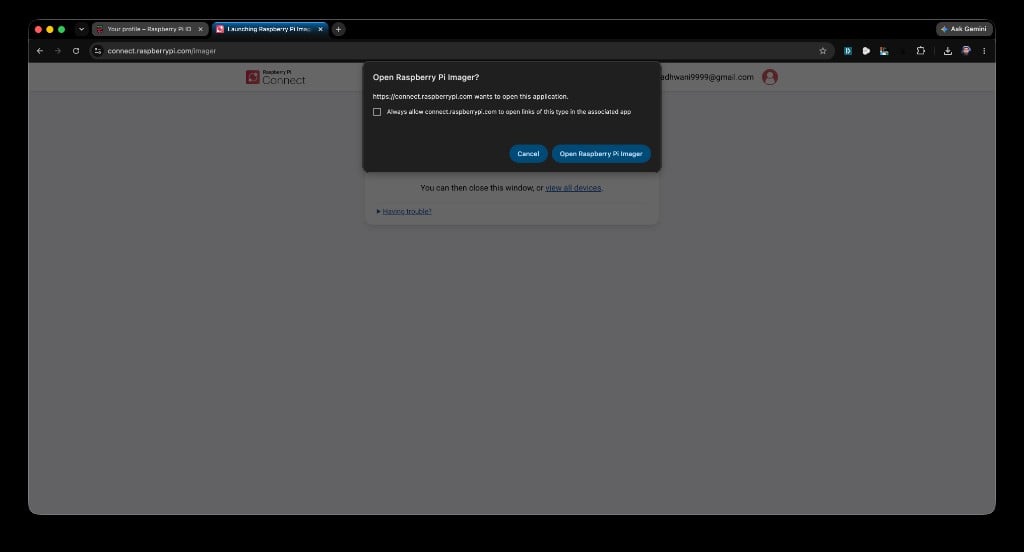
 Your browser asks if you want to open Raspberry Pi Imager. Click **Open Raspberry Pi Imager**.
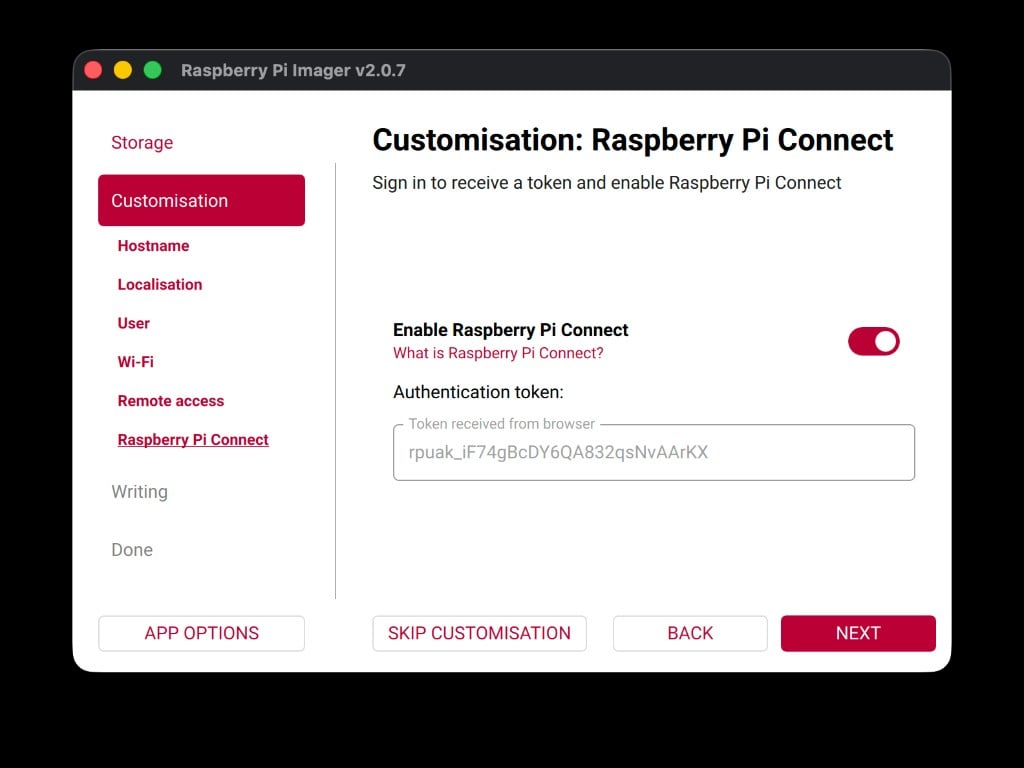
 The Imager now shows **"Token received from browser"** with the authentication token filled in. Click **Next** to continue.
 At this point, you have configured the hostname, locale, username, password, WiFi, SSH, and Raspberry Pi Connect. You are ready to write the image.
### Write the image to the SD card
The Imager shows a summary of everything you configured. Review it carefully:
* **Device**: Raspberry Pi Zero 2 W
* **OS**: Raspberry Pi OS (32-bit)
* **Hostname**: picar
* **Username**: car
* **WiFi**: your network name
* **SSH**: enabled
* **Raspberry Pi Connect**: enabled
At this point, you have configured the hostname, locale, username, password, WiFi, SSH, and Raspberry Pi Connect. You are ready to write the image.
### Write the image to the SD card
The Imager shows a summary of everything you configured. Review it carefully:
* **Device**: Raspberry Pi Zero 2 W
* **OS**: Raspberry Pi OS (32-bit)
* **Hostname**: picar
* **Username**: car
* **WiFi**: your network name
* **SSH**: enabled
* **Raspberry Pi Connect**: enabled
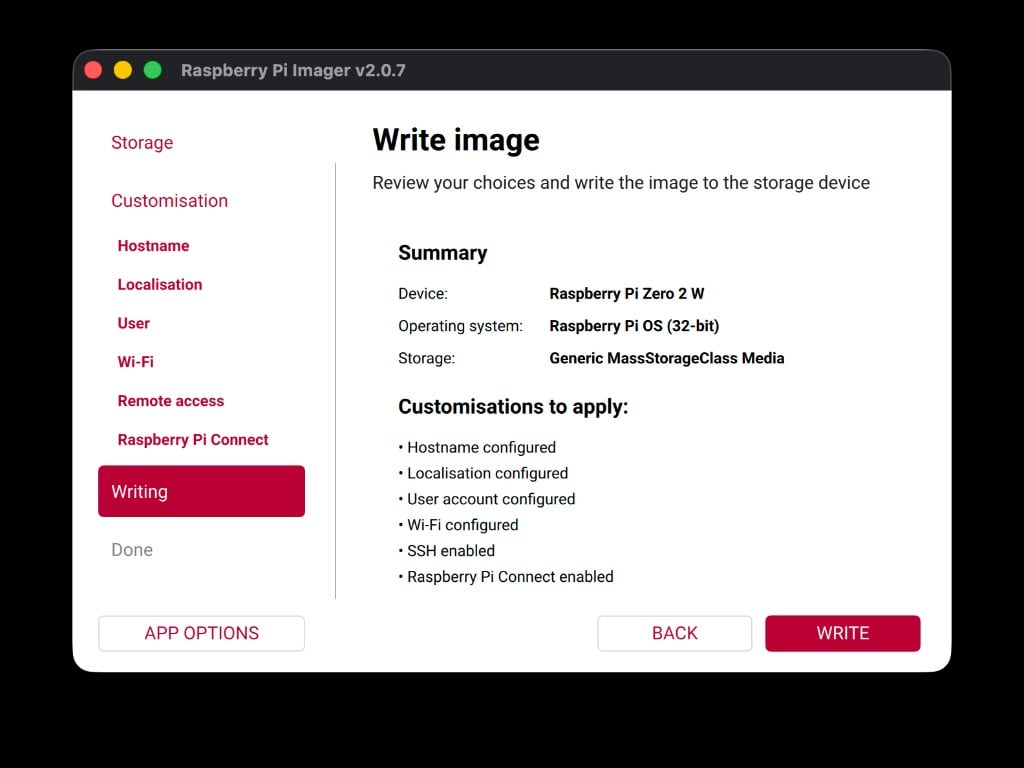 If anything looks wrong, click **Back** and fix it now. Once writing starts, you cannot change these settings without re-flashing from scratch.
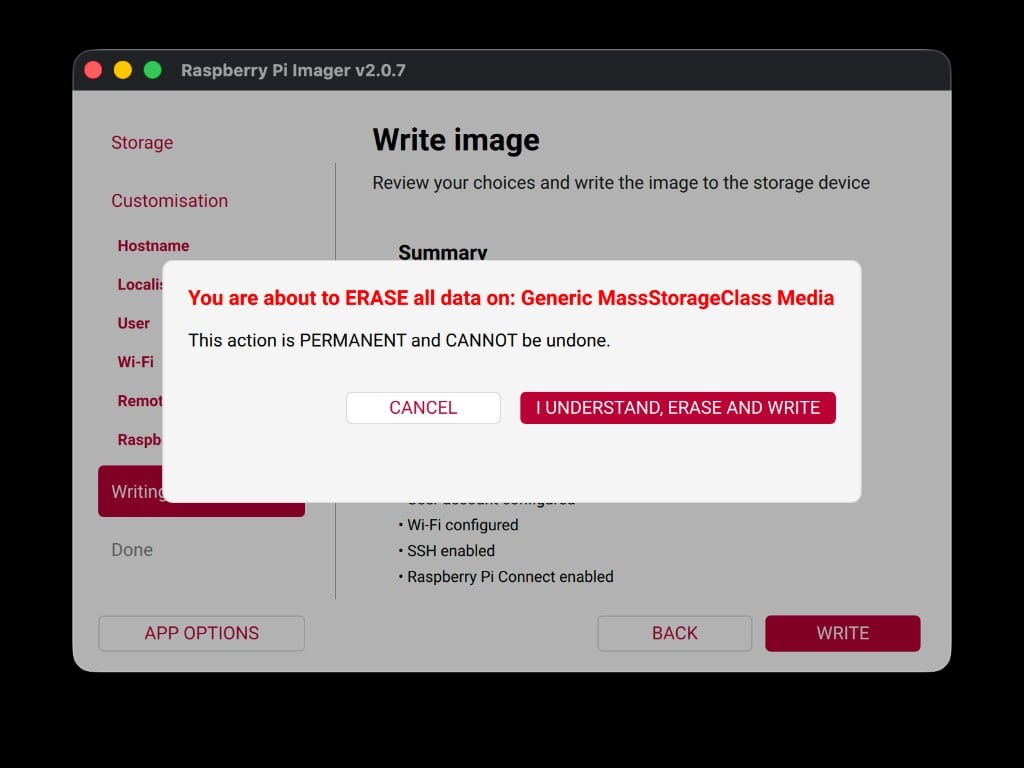
Click **Write**. The Imager warns you that **all data on the SD card will be erased**. This is expected — click **I UNDERSTAND, ERASE AND WRITE** to confirm.
If anything looks wrong, click **Back** and fix it now. Once writing starts, you cannot change these settings without re-flashing from scratch.
Click **Write**. The Imager warns you that **all data on the SD card will be erased**. This is expected — click **I UNDERSTAND, ERASE AND WRITE** to confirm.
 macOS asks for your computer password to allow disk access. Type your **Mac login password** (not the `car` password you set earlier) and click **OK**.
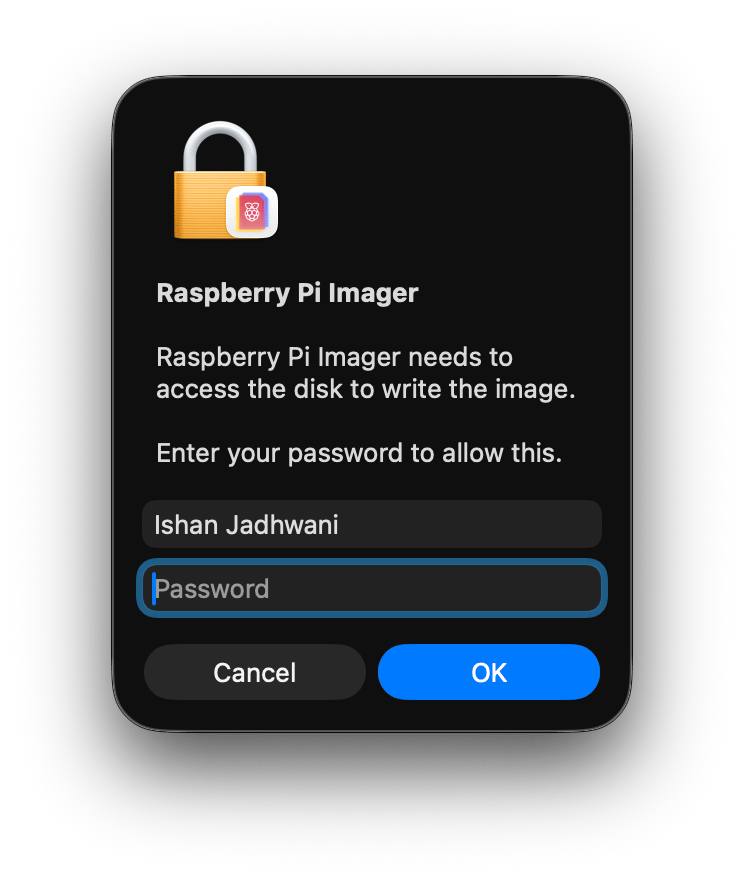 This is your laptop's password — the one you use to unlock your Mac. It is not the same as the `car` password you just configured for the robot.
The Imager writes the operating system to the SD card and then verifies the data. This takes **5 to 10 minutes** depending on the speed of your SD card. When it finishes, you see a **"Write complete!"** success message.
This is your laptop's password — the one you use to unlock your Mac. It is not the same as the `car` password you just configured for the robot.
The Imager writes the operating system to the SD card and then verifies the data. This takes **5 to 10 minutes** depending on the speed of your SD card. When it finishes, you see a **"Write complete!"** success message.
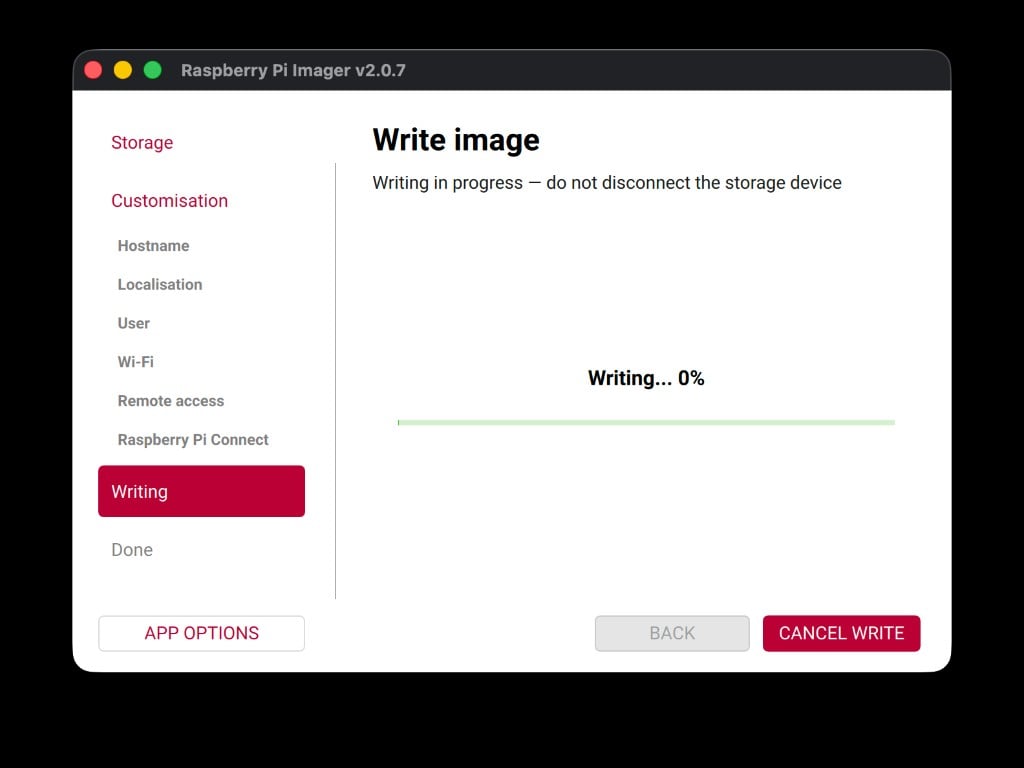 Click **Finish**, then remove the SD card reader from your laptop.
Do not unplug the SD card reader or close the Imager while it is writing. Let it finish completely.
### Insert the SD card and boot the robot
Pull the microSD card out of the SD card reader.
Look at the back of the robot. The Raspberry Pi sits below the Robot HAT board, and the SD card slot is visible from the rear — you do not need to flip the robot over. Slide the microSD card into the slot with the gold contacts facing up (toward the board). Push gently until you feel it click into place.
Find the toggle switch on the back of the Robot HAT (the top board). Flip it on. The green LED on the Pi should start blinking — this means the Pi is reading from the SD card and booting up.
### What happens during first boot
The first time the Raspberry Pi boots with a fresh SD card, it needs extra time to:
* Expand the file system to fill the entire SD card
* Apply the hostname, username, password, and WiFi settings you configured
* Connect to your WiFi network
* Register with Raspberry Pi Connect
**First boot takes 2 to 3 minutes.** The green LED blinks rapidly while the Pi is working. Wait until the blinking slows down before trying to connect.
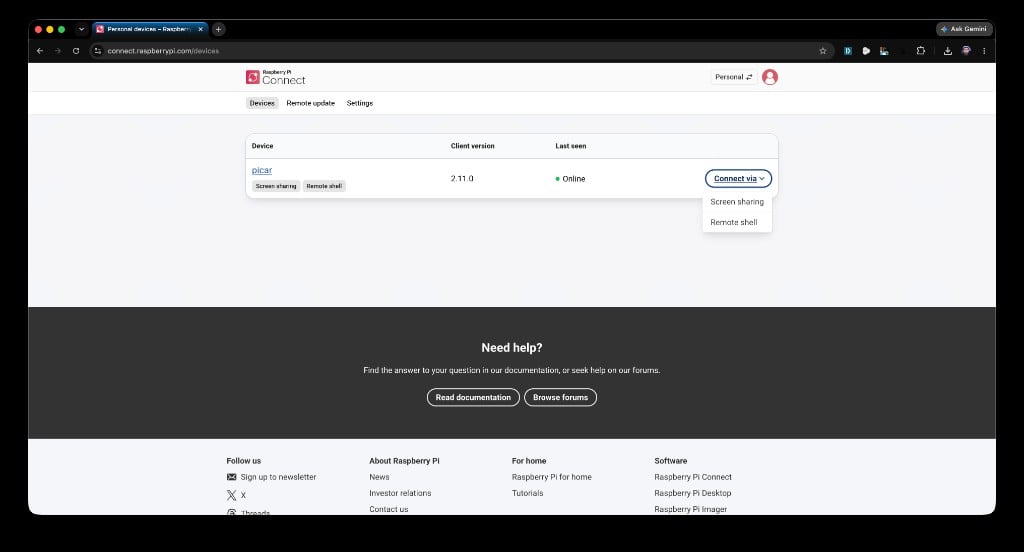
Once the Pi connects to WiFi, you can confirm it is online by checking your Raspberry Pi Connect dashboard at [connect.raspberrypi.com](https://connect.raspberrypi.com). Your robot should appear as **picar** with a green **Online** status.
Click **Finish**, then remove the SD card reader from your laptop.
Do not unplug the SD card reader or close the Imager while it is writing. Let it finish completely.
### Insert the SD card and boot the robot
Pull the microSD card out of the SD card reader.
Look at the back of the robot. The Raspberry Pi sits below the Robot HAT board, and the SD card slot is visible from the rear — you do not need to flip the robot over. Slide the microSD card into the slot with the gold contacts facing up (toward the board). Push gently until you feel it click into place.
Find the toggle switch on the back of the Robot HAT (the top board). Flip it on. The green LED on the Pi should start blinking — this means the Pi is reading from the SD card and booting up.
### What happens during first boot
The first time the Raspberry Pi boots with a fresh SD card, it needs extra time to:
* Expand the file system to fill the entire SD card
* Apply the hostname, username, password, and WiFi settings you configured
* Connect to your WiFi network
* Register with Raspberry Pi Connect
**First boot takes 2 to 3 minutes.** The green LED blinks rapidly while the Pi is working. Wait until the blinking slows down before trying to connect.
Once the Pi connects to WiFi, you can confirm it is online by checking your Raspberry Pi Connect dashboard at [connect.raspberrypi.com](https://connect.raspberrypi.com). Your robot should appear as **picar** with a green **Online** status.
 Your SD card is flashed, your robot is booting, and you are ready to move on to the next section: connecting via SSH.