> ## Documentation Index
> Fetch the complete documentation index at: https://stem-docs.intellectualpoint.com/llms.txt
> Use this file to discover all available pages before exploring further.
# Component and parts check
> Identify every part, screw, and tool in your Ender 3 kit before you start building.
## Know your parts before you build
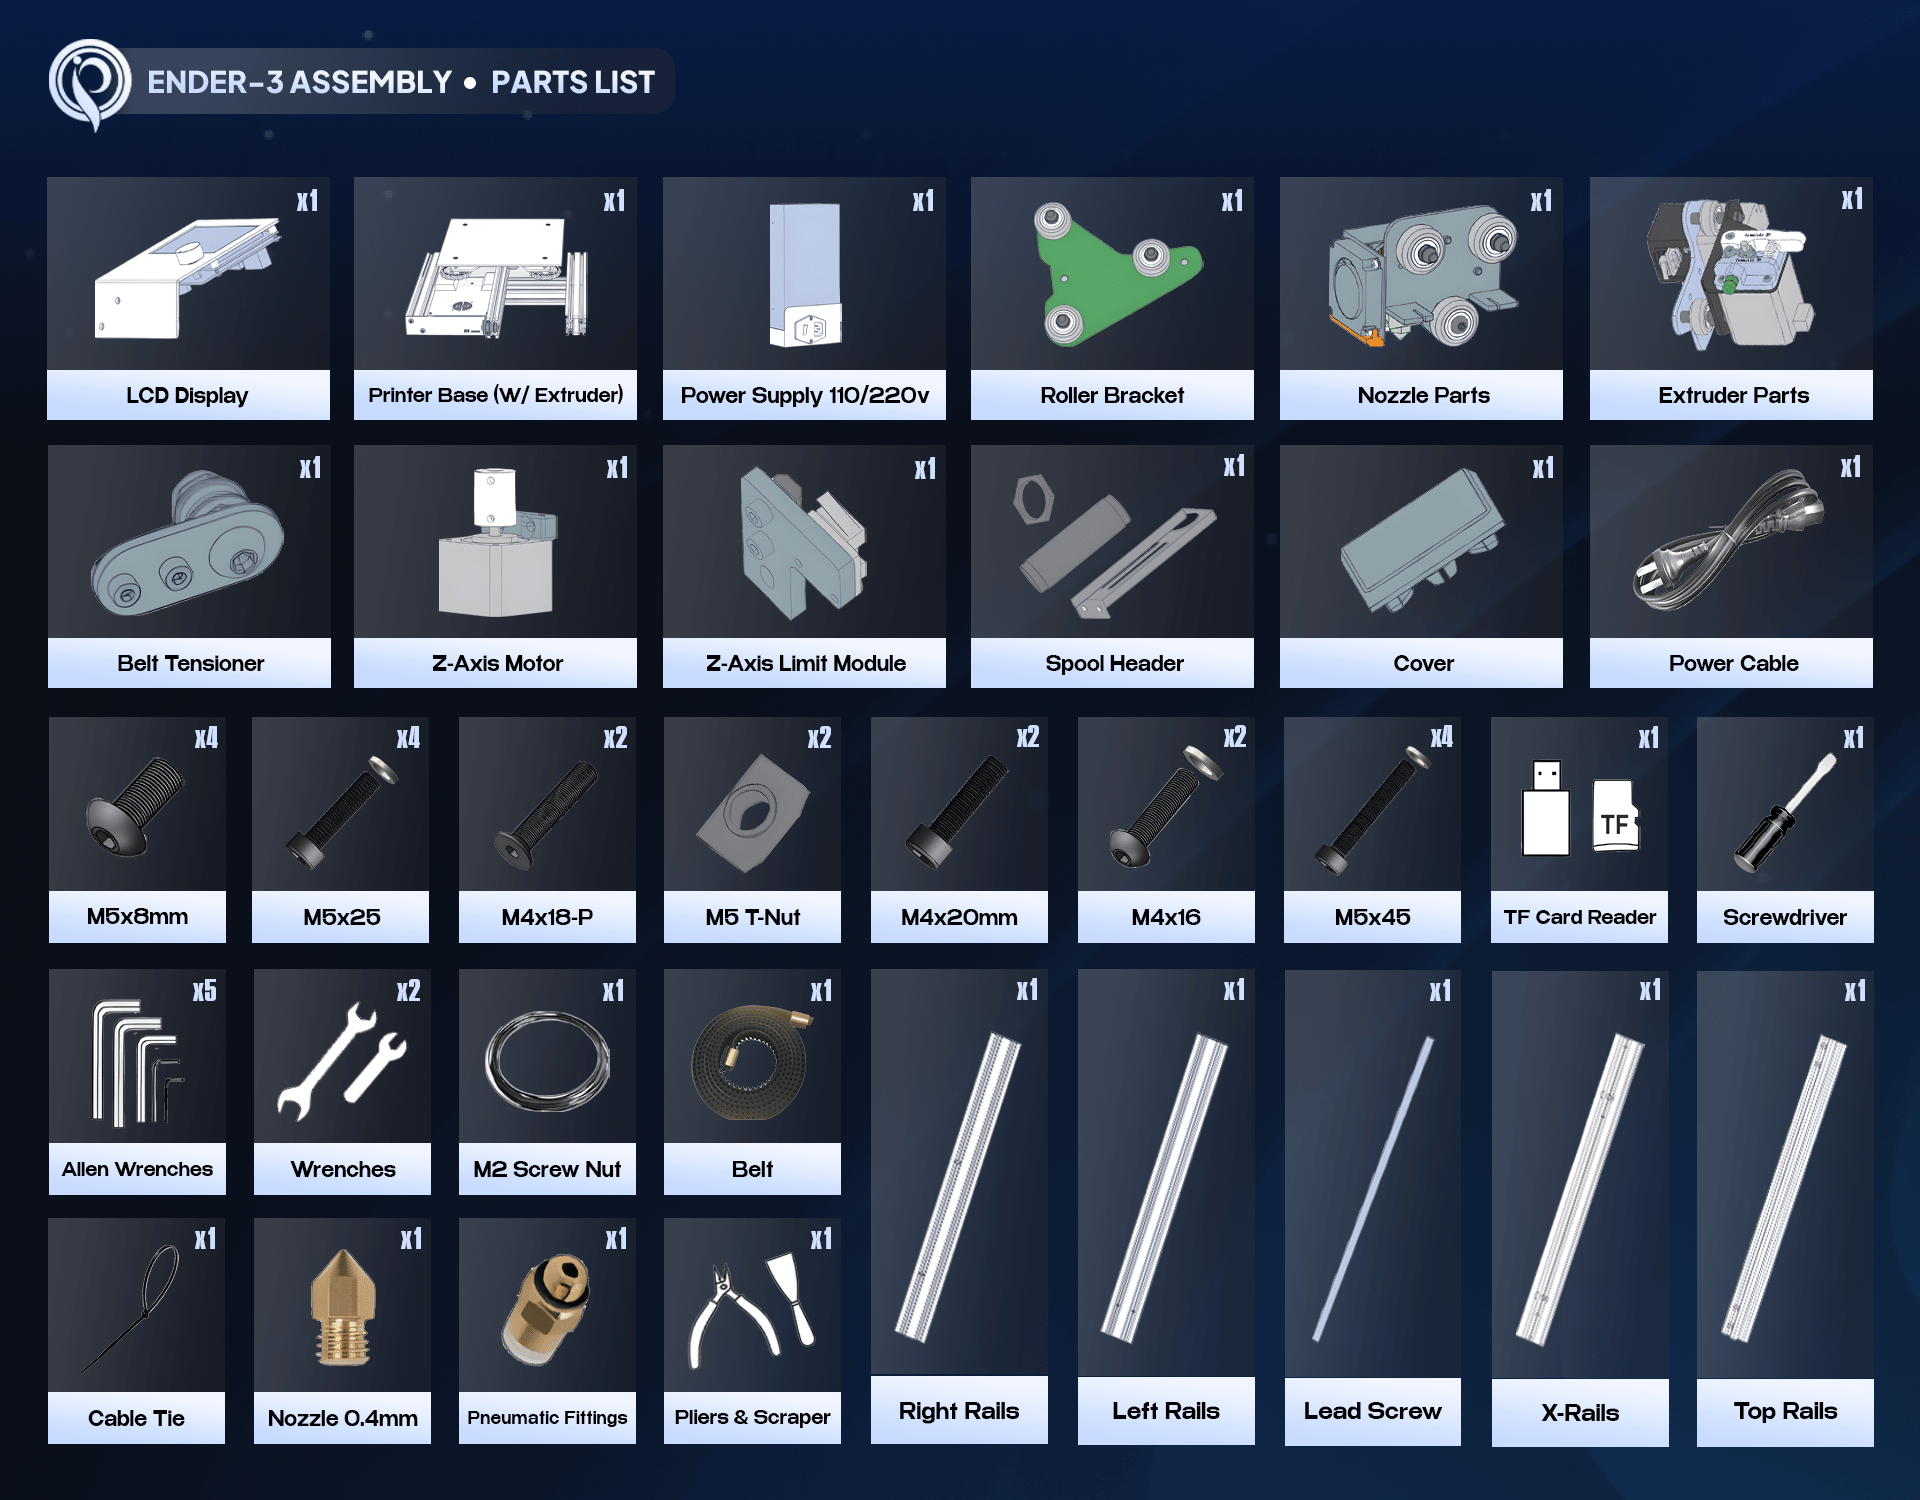
A successful build starts with a full inventory. Lay every part out where you can see it, confirm nothing is missing, and get familiar with the screws and tools you will use again and again.
 ## Free the bed wiring
Before anything else, find the extruder wire wrapped around the printer bed and **gently unwrap it** so it trails freely toward the back. Freeing this cable now saves you trouble later.
On the printer base, find the braided wire (with a thick white tube) that runs to the extruder assembly.
Carefully unwind it from around the bed until roughly three feet of cable trails freely behind the printer.
## The main parts
| Part | What it is |
| ------------------------------- | -------------------------------------------------------- |
| Printer base and bed | The largest piece - holds the moving bed and electronics |
| Side rails (2, longer) | The vertical gantry uprights |
| Extruder rail (1 long, 1 short) | Hold the print head and top of the frame |
| Top rail | The crossbar that caps the gantry |
| Extruder block (QR code) | The filament feeder / extruder motor |
| Roller bracket | Green triangle with three wheels |
| Z-axis motor | Metal cube with a spinning cylinder |
| Z-axis limit switch | L-shaped board with a click switch |
| Power supply | Large silver box with a power switch |
| LCD panel | Screen and control knob |
| Spool holder | Plastic tube for the filament spool |
| Filament | A spool of PLA |
## The tools and screws
A set of five sizes. You will use the numbers 3, 4, and 5 most. "Number 5" is the largest.
A screwdriver for identifying holes, and a metal scraper for removing prints.
For cutting filament at a clean 45-degree angle.
Labeled bags: M5x45, M5x25, M4x18, M5x8, M4x20, M4x16, M5 T-nuts, and more.
Each screw bag is labeled with a size like **M4x20** (4 mm wide, 20 mm long). When a step calls for a screw, match the label exactly - the wrong length will not seat correctly.
You have found and identified every part on the parts list, confirmed nothing is missing, freed the bed wiring, and organized your screws and tools within reach. Time to build.
The aluminum rails have **sharp edges and corners**. Handle them by the flat sides and keep your fingers off the cut ends.
## Free the bed wiring
Before anything else, find the extruder wire wrapped around the printer bed and **gently unwrap it** so it trails freely toward the back. Freeing this cable now saves you trouble later.
On the printer base, find the braided wire (with a thick white tube) that runs to the extruder assembly.
Carefully unwind it from around the bed until roughly three feet of cable trails freely behind the printer.
## The main parts
| Part | What it is |
| ------------------------------- | -------------------------------------------------------- |
| Printer base and bed | The largest piece - holds the moving bed and electronics |
| Side rails (2, longer) | The vertical gantry uprights |
| Extruder rail (1 long, 1 short) | Hold the print head and top of the frame |
| Top rail | The crossbar that caps the gantry |
| Extruder block (QR code) | The filament feeder / extruder motor |
| Roller bracket | Green triangle with three wheels |
| Z-axis motor | Metal cube with a spinning cylinder |
| Z-axis limit switch | L-shaped board with a click switch |
| Power supply | Large silver box with a power switch |
| LCD panel | Screen and control knob |
| Spool holder | Plastic tube for the filament spool |
| Filament | A spool of PLA |
## The tools and screws
A set of five sizes. You will use the numbers 3, 4, and 5 most. "Number 5" is the largest.
A screwdriver for identifying holes, and a metal scraper for removing prints.
For cutting filament at a clean 45-degree angle.
Labeled bags: M5x45, M5x25, M4x18, M5x8, M4x20, M4x16, M5 T-nuts, and more.
Each screw bag is labeled with a size like **M4x20** (4 mm wide, 20 mm long). When a step calls for a screw, match the label exactly - the wrong length will not seat correctly.
You have found and identified every part on the parts list, confirmed nothing is missing, freed the bed wiring, and organized your screws and tools within reach. Time to build.
The aluminum rails have **sharp edges and corners**. Handle them by the flat sides and keep your fingers off the cut ends.